Introduction
I have suggested brilliant 10 steps how to add SSL certificate through IIS (Internet Information Service). Suppose, we don't have panel to deploy our app enabled with SSL then we need IIS complete knowledge to deply our app with SS certificate.Step 1: Open your IIS (Internet Information Services) from start windows or with hotkeys (ctrl + R then type inetmgr).
Step 2: On the home you will see features of IIS (Internet Information Services) then click on the “Server Certificates”, you are now in server certifcates menu.
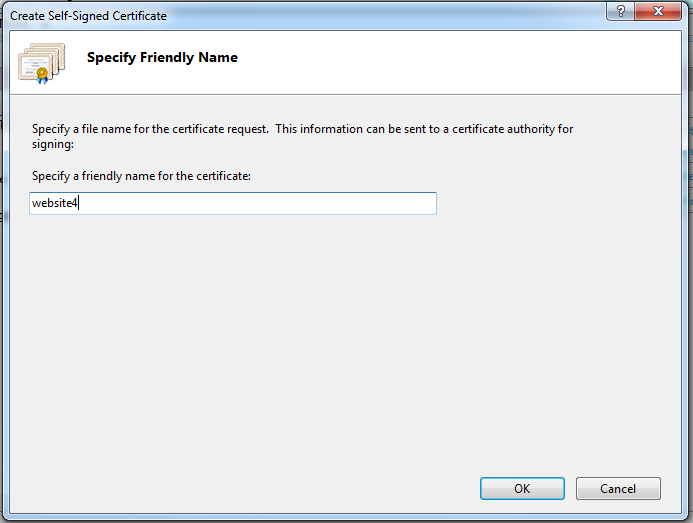
Step 3: Now click on right side pane Under “Actions”, click on “Create Self Signed certificate”, now you will pop up a new window “Specify Friendly Name”. Type your desired name here and click on “OK” button.
Step 4: Now you will see “Website4” certificate is now listing in certificate lists.
Step 5: Now go to your “Sites” and click on specific website for which do you need to install certificate. Now click on “Edit Bindings…”.
Step 6: Now click on “Add” button to add signed certificate to your website.
Step 7: Now you are on “Add Site Binding” windows, here you have to select type “https” & enter IP Address & also defined Port no for your respective website, now at the end on “SSL Certificate”, set your certificate which is created in our earlier steps.
Step 8: Here you can see your certificate click on certificate.
Step 9: Here you can see your website “Site Bindings”, now you can click on “Browse” button and it will navigate to view your website in browser explorer.
Step 10: Here you can see that your web address has included “https”. Now SSL certificate has been installed successfully in your website.
Above key steps will help to work out on how to add SSL Certificate.


Post A Comment:
0 comments: